Taking card payments at community events
How to create a SumUp or PayPal Business account and take card payments
- Card payment basics
- SumUp and Zettle pros and cons
- Using SumUp: step by step
- Using Zettle: step by step
Card payment basics
In order to take card payments at your events you will need:
- An account with a card payment provider such as SumUp or Zettle (PayPal)
- An app installed on your mobile phone or tablet
- A card reader or a mobile phone/tablet that is suitable for ‘Tap to Pay’
You will have to pay a charge for the card payment provider to process the payments. The charges are usually a percentage of the transaction amount.
For example, SumUp charge 1.69% per transaction, and Zettle charge 1.75% (as at October 2024).
You can buy a card reader from the payment provider (these cost around £50). If you are a community group in Brighton & Hove, you can hire a Zettle or SumUp card reader from the Resource Centre for £2.
If you have a suitable mobile phone or tablet, you don’t need a card reader – you can take payments using ‘Tap to Pay’, where the person taps their card directly on your phone.
The card payment providers do not have special accounts for community groups, so your options are:
- Set up a ‘sole trader’ or ‘individual seller’ account, if your group is not a registered charity or a limited company
- If you are a registered charity, set up a charity account
- If you are a limited company, set up a business account
This information sheet is aimed at small community groups that are not registered charities or limited companies, so the information here is about setting up a ‘sole trader’ account.
This will be in the name of one member of your group, but you can use a group email address and connect it to the group bank account.
SumUp and Zettle pros and cons
There are many different card payment companies. SumUp and Zettle are the two we have researched for this information sheet, but you could also choose others. The issues are likely to be similar with all of them.
| SumUp | Zettle | |
|---|---|---|
| Pros | Slightly lower transaction charge | Account can be logged in on more than one device at the same time |
| SumUp Business account comes with a Mastercard, so you can access your funds without transferring to a bank account | Group bank account can be added when setting up the account | |
| Easy to create online payment links (higher transaction charge for these) | ||
| £5,000 in card payments can be taken before your ID must be verified | ||
| Cons | Need to email them to change bank account name to the group’s account, so there could be a delay in getting set up | ID verification required at initial setup of the account |
Using SumUp: step by step
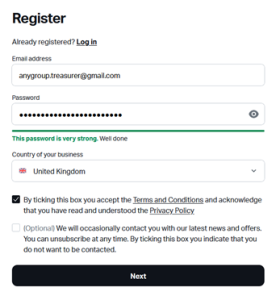
Step 1: email address and password
- Go to https://sumup.me
- Click on the link to Register
- Enter your email address and create a password
The password must have at least 8 characters. The website will prompt you to create a stronger password if it is too easy to guess. - Tick the box to accept the terms and conditions and click Next
Step 2: confirm your email address
- Go to your own email inbox and click the verification link they have sent you
- You’ll be sent to the login screen, where you can log in with the password you just created
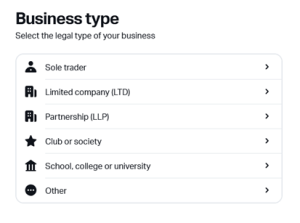
Step 3: choose a Sole trader account
- Choose Sole trader from the list of business types
- Don’t choose Club or society, unless you are a registered charity or limited company.
- Choose Other from the list of business categories
- Under Other, you can choose Membership organisation
Step 4: Business details
- Fill in the name and description of your group. You need to give a phone number you have access to here, as they will send you a verification code by text
Step 5: Personal details
- Enter your name and date of birth
- Enter your home address. There is also an option to add a different business or trading address
Step 6: Sales estimate
- Estimate how much you expect to take in card payments per month
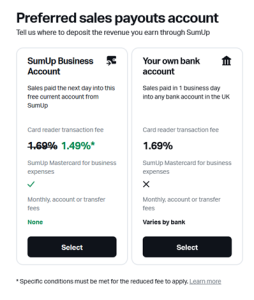
Step 7: bank account
- Choose where you want your money deposited
In the first instance, choose SumUp Business account here. We recommend adding your group’s bank account later, but this will take a few days to complete. (see Step 9) - They will send you a Mastercard in the post, so you can spend money from the SumUp business account. This account will be in the name of the individual group member who has set up the SumUp account. We recommend that you set up an internal system of two group members authorising each transaction from the account.
- More information on the SumUp Business account can be found at: https://help.sumup.com/en-GB/articles/4RnVqiWwOcTio8ifF60URc
Step 8: confirm and verify phone number
- Review your information and choose Confirm
- Verify your phone number by entering a code they send you by text
Step 9: contact support to add your group’s bank account
In order to connect the SumUp account with your group’s bank account, you will need to:
- Email [email protected] and attach a recent bank statement. Ask for this account to be added to your SumUp account
Step 10: use the SumUp app on your phone
- Download the free SumUp app from the Apple store or the Google Playstore
- Log in using the email address and password you created at Step 1
Card reader
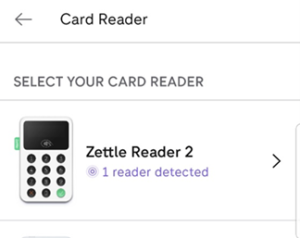
- If you have a card reader, you will need to pair your phone to the card reader using Bluetooth. Click the icon in the top right corner of the app to go into the Profile settings.
- Under Payment methods, click Card reader
- Connect to your card reader, following the instructions on the screen
Tap to Pay
- You can also set up ‘Tap to Pay’ on your phone to take payments without a card reader.
- In the Profile section, under Payment methods, click ‘Tap to Pay’. This is available on Android phones running version 11 or later, or iphones with iOS 16.4 onward. It is not available on iPads. You may need to enable NFC in your phone’s settings. The app will give you instructions how to do this.
Taking payments
- You can create items in the app, such as raffle tickets, or you can just go to the Checkout screen to take a payment of any amount.
- If you sell items, then you will get a report after the event of how much you took for each different item.
- If you want more than one volunteer to take card payments at your event, you will need to add Employee profiles for each volunteer in advance. This can be done in the app or at sumup.me. Each person will log in to their own profile with their own email address and password.
- To add employees, go into the Profile section of the app and scroll down to Your team. Click on Employees. Click the button to Add team member and follow the instructions.
Step 11: creating payment links
You can create one-off or reusable payment links with your SumUp account. These can be sent to specific people by email or text, or you can print out a QR code to display at your event.
The link can either be for a payment of a fixed amount, or you can leave the amount open for the person paying you to fill in.
When someone follows the link, they are taken to a secure web page where they can enter their card details to pay you.
To create a payment link:
- Log in to your account at sumup.me or open the app
- Find Payment Links in the main menu
- Click the button to Create Payment Link
- Choose whether you want the link for a fixed amount or open
- Add a description of the link (eg Donation, or Room hire fee)
- Choose whether the link will be reusable or not – if you want a general donation link, make it reusable. If you are asking someone for a specific amount they owe you, leave the reusable setting switched off.
- Check the other options and when you are happy, click to Create the payment link
- Copy the link and paste it into your email, or put it on your website
- There is also the option to create a QR code for your payment links, which you can print out for people to scan with their phones
NB you will be charged a higher percentage fee for these payments than for card payments taken in person on a card reader or with ‘Tap to Pay’.
Using Zettle: step by step
Zettle is owned by PayPal. If you do not already have a Zettle account, you will need to set up a PayPal Business account in order to take card payments with the Zettle app.
Step 1: email address and password
As with SumUp, your PayPal business account will be in the name of an individual member of your group.
- Choose someone who doesn’t already have a Zettle account in their own name and who doesn’t already have a Paypal business account in their name. An individual can have one personal Paypal account and one ‘individual seller’ business account.
- If your group has an email address, use this for the business account. Make sure you have access to the account so that you can verify it.
- If not, use an email address that is different from the one used for the person’s own PayPal account.
- Paypal will do credit and ID checks on the account holder, and will ask for documents (passport/driving licence) to be provided to confirm ID.
Step 2: phone number
- Enter a mobile number they can use to text you authorisation codes to access the account
Step 3: business type
- Choose Individual seller from the list of business types
Step 4: personal and business details
- You will be asked for your name, business address, home address, phone number, date of birth and nationality.
- When asked for Business name, give the name that is on your group’s bank account.
- You may be asked to give the same information multiple times.
- There are some questions about your business, including what you sell (you can choose ‘Civic, Social and Fraternal Associations’ from this list)
- You will probably have to upload a photo of your driving licence or passport as part of this process
Step 5: bank account
After setting up the PayPal business account, you should be redirected to the home page of PayPal, but this may not happen.
- Go to PayPal.com and log in with the email address and password you created at Step 1.
- There should be a link on the front page which you can use to connect your group’s bank account to the PayPal business account. If it’s not obvious, go to Pay & Get Paid at the top of the screen, then to Bank accounts and cards. Click the button to ‘Link a bank account’.
- Choose Business account and enter your group’s account number and sort code.
- After you have given the account details, PayPal will send a small amount of money to your bank account, giving a code as a reference.
- If you have access to online banking, log in to your bank account and submit this code to PayPal, to verify your account.
- If you do not have immediate access to your bank account, you will need to log in to PayPal to verify the account once you receive your bank statement and can see the code. Until you have done this, you won’t be able to withdraw any money from your PayPal account into your bank account. Any money you take in card payments at your events will be held in your PayPal account until the bank account is verified.
Step 6: use the Zettle app on your phone
- Download the free Zettle Go app from the Apple store or Google Playstore.
- Log in with the email address and password you created at Step 1.
- You can have more than one volunteer at your event logged in to the same Zettle account on different phones. Each person will need a card reader paired to their phone (but see information below about ‘Tap to Pay’).
Card reader
- If you have a card reader, you will need to pair your phone to the card reader using Bluetooth. Go to the menu button in the app (top left) and choose Settings.
- Under Hardware, choose Connect card reader
- Turn the card reader on and hold the power button down – the display should show a 3 digit number.
- Make sure your phone has Bluetooth and it is switched on.
- Your phone should detect the reader. If it doesn’t, try switching off Bluetooth on your phone then switching it back on again.
- Tap the reader when it comes up under detected card readers
- Press green button on card reader to confirm matching 6 digit codes
Tap to Pay
- You can also set up ‘Tap to Pay’ on your phone to take payments without a card reader.
- In the Menu, go to Settings.
- Under Payment types, make sure ‘Tap to Pay’ is switched on. This is available on Android phones running version 11 or later, or iPhones with iOS 16.4 onward. It is not available on iPads. You may need to enable NFC in your phone’s settings. The app will give you instructions how to do this.
Taking payments
- You can create products in the app, such as raffle tickets, or you can just take a payment of any amount.
- If you sell products, then you will get a report after the event of how much you took for each different product.
- To add products, go to the Menu and choose Sell. At the top of the screen, choose Products from the dropdown menu.
- Click on the Edit symbol, then the + that appears at the bottom of the screen
- Choose Add product and enter the name and price of the product. Click the tick when you are finished, then tick again to return to the list of products.
- If you just want to take a custom amount, choose Amount from the dropdown menu, instead of Product.
Published: November 2024


